Hiển thị các bài đăng có nhãn banh-thuan. Hiển thị tất cả bài đăng

Thứ Bảy, 28 tháng 6, 2025

Traditional Arrowroot Thuẫn cake for Tet Holiday

This Traditional Arrowroot Thuan cake recipe provides an authentic flavor, making it easy for you to bake delicious, attractive Banh Thuan right at home. It's perfect for treating family and friends during the Lunar New Year celebrations!

traditional-arrowroot-thuan-cake-for-tet-holiday-1

Traditional Arrowroot Thuẫn cake for Tet Holiday

Ingredients for Traditional Arrowroot Thuẫn cake for Tet

  • 800g fine arrowroot flour (bột bình tinh)
  • 10 free-range chicken eggs
  • 200g tapioca starch
  • 1kg sugar
  • 1 tube vanilla extract
  • cooking oil
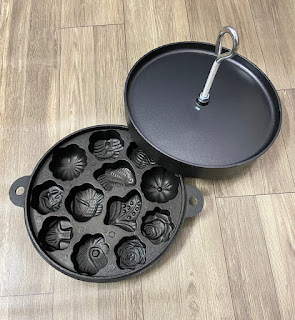
  • Equipment: banh thuan molds, charcoal stove

Instructions for Traditional Arrowroot Thuẫn cake for Tet

Step 1: Prepare the Thuẫn cake Batter

For a fluffy, tender, and fragrant Banh Thuan, the batter must be thoroughly and smoothly mixed, free of any lumps.

- Crack the chicken eggs into a large bowl and whisk vigorously until frothy and voluminous. Gradually add the sugar, continuing to whisk until the mixture becomes thick and pale. You can test its consistency by dropping a small amount of water into the mixture; if it doesn't dissolve, it's ready. Strain the egg mixture through a sieve to remove any impurities.

- Sift the arrowroot flour and vanilla extract. Divide the sifted flour into small portions. Gradually add each portion of flour to the egg mixture, whisking thoroughly for about 3 minutes after each addition to ensure the flour and other ingredients are well combined. Repeat this process until all the flour is incorporated.

Step 2: Preheat the Thuẫn cake Molds

traditional-arrowroot-thuan-cake-for-tet-holiday-2

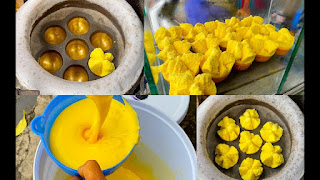
Place the Banh Thuan molds on a glowing charcoal stove. Close the mold lid. You can also place hot charcoal on top of the mold lid to heat both sides of the mold evenly. Once hot, open the lid and use a pastry brush or a cloth tied to a chopstick, dipped in a little cooking oil, to grease the cavities of the mold.

Step 3: Charcoal Grilling Thuẫn cake for a Fragrant Finish

traditional-arrowroot-thuan-cake-for-tet-holiday-3

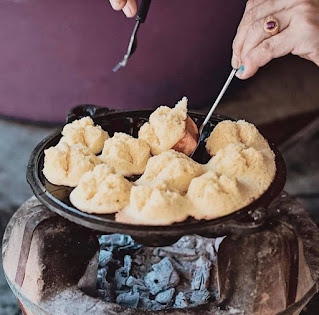
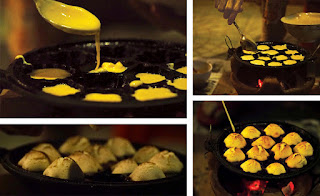
- Scoop the batter and fill each mold cavity completely, ensuring the batter reaches just to the mold's edge. Close the mold lid. Continue by using tongs to place hot, glowing charcoal from beneath the stove onto the mold lid to ensure the Banh Thuan bakes evenly. Wait approximately 4-5 minutes for the cakes to cook.

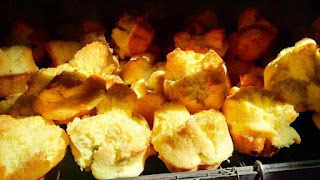
- You can check for doneness by inserting a toothpick into a cake; if it comes out clean, the cake is ready. When fully cooked, Banh Thuan will have a beautiful golden-yellow or deep golden color, bloom like a mai flower, and release a rich, aromatic fragrance. Use a pointed stick or a fork to carefully remove the cakes from the molds.

What is Arrowroot Flour? What are its Benefits?

Arrowroot powder (or arrowroot starch) has been used for over 7000 years, extracted from the rhizomes of the arrowroot plant – a type of maranta family plant with a shape similar to a rhinoceros horn. Typically, to make arrowroot flour, the rhizomes are ground, soaked in water, and then the starch is allowed to settle.

traditional-arrowroot-thuan-cake-for-tet-holiday-4

Health Benefits of Arrowroot Flour:

  1. Arrowroot starch is extremely easy to digest, even for infants in the weaning stage.
  2. Arrowroot also contains various B vitamins, including thiamine, niacin, and pyridoxine.
  3. It provides essential trace elements for the human body such as copper, iron, manganese, magnesium, phosphorus, and zinc.
  4. Arrowroot flour is completely gluten-free, making it an excellent alternative to wheat flour for those with gluten allergies.
  5. Helps balance the body's pH.
  6. Improves the digestive system due to its easily absorbable starch and high fiber content, which helps balance blood sugar and prevent diabetes.
  7. Copper and iron in arrowroot flour support better metabolic function and boost the body's metabolism.
  8. Helps reduce bad cholesterol and aids in weight loss.
  9. Arrowroot flour is rich in vitamin B9 (folate), which is highly beneficial for pregnant women.
  10. Arrowroot flour is a source of starch for people with gluten allergies (commonly found in wheat flour).

Applications of Arrowroot Flour in Cooking and Baking:

Arrowroot flour helps create a crispy texture for pastries or fried foods, thickens sauces for desserts like chocolate sauce or coconut milk sauce, and is used as an alternative to wheat flour in dishes like Banh Thuan in Central Vietnam.

How to Make In cake with Arrowroot Flour: A Traditional Vietnamese Treat

In cake is a cherished Vietnamese delicacy, especially popular during Tết (Lunar New Year) and other festive occasions. This traditional no-bake cake is renowned for its melt-in-your-mouth texture and delicate sweetness. Unlike many baked goods, Banh In relies primarily on arrowroot flour (bột bình tinh), creating a unique, tender crumb that simply dissolves on the tongue. This recipe will guide you through making authentic Banh In at home, perfect for sharing with family and friends.

how-to-make-in-cake-vietnamese-with-arrowroot-flour-1

Ingredients for In cake

  • 200g fine arrowroot flour (bột bình tinh)
  • 100g granulated sugar (or to taste, for a sweeter cake)
  • 50ml coconut milk (full-fat for richer flavor)
  • 1/4 tsp vanilla extract (optional, for added aroma)
  • A pinch of salt (enhances sweetness)
  • Food coloring (optional, traditional colors are white, green, pink)
  • Banh In molds (various shapes and sizes available, often intricate designs)
how-to-make-in-cake-vietnamese-with-arrowroot-flour-2

Instructions for Making In cake

Step 1: Prepare the Arrowroot Flour
Place the arrowroot flour in a dry pan over very low heat. Gently toast the flour for about 10-15 minutes, stirring continuously to prevent burning. This step helps remove moisture and enhances the flour's aroma, contributing to the cake's signature texture. Once lightly fragrant, remove from heat and let it cool completely. Sift the cooled flour to remove any lumps.

Step 2: Prepare the Sweetened Coconut Milk
In a small saucepan, combine the granulated sugar, coconut milk, and a pinch of salt. Heat over low heat, stirring until the sugar is completely dissolved. Do not bring to a boil. Remove from heat and let it cool to room temperature. Stir in the vanilla extract (if using). If you plan to make colored Banh In, divide the liquid into separate bowls and add a few drops of food coloring to each, mixing well.

Step 3: Combine Flour and Liquid
Gradually add the cooled sweetened coconut milk mixture to the sifted arrowroot flour, a little at a time. Mix thoroughly with your hands, crumbling the mixture between your fingers. The goal is to achieve a consistency similar to wet sand – not too wet, but moist enough that it holds its shape when pressed. If it's too dry, add a tiny bit more coconut milk; if too wet, add a little more sifted arrowroot flour. This step is crucial for the correct Banh In texture.

Step 4: Mold the Banh In
Take your Banh In molds. Firmly press the prepared flour mixture into the molds, ensuring it's tightly packed. You can use a spoon or your fingers to press it down firmly. The tighter you pack it, the more defined the cake's shape and design will be. If your mold has a removable plunger, this makes it easier to compress.

Step 5: Unmold and Dry
Carefully unmold the Banh In cakes onto a clean, dry tray or parchment paper. The cakes are delicate at this stage. Let the Banh In air dry at room temperature for several hours, or even overnight, depending on the humidity. This drying process allows the cakes to firm up and fully set, ensuring their melt-in-your-mouth quality.

Thứ Hai, 16 tháng 6, 2025

How to Make Central Vietnamese Bánh Thuẫn with Two Types of Eggs

Discover the authentic taste of Vietnamese Bánh Thuẫn with this traditional recipe, focusing on the unique methods of Central Vietnam using both chicken and duck eggs for a distinct texture and richness. The combination of chicken and duck eggs is key to achieving the beautiful "blooming flower" effect (nở bung cánh hoa) and perfect rise in this traditional cake.

how-to-make-central-vietnamese-banh-thuan-with-two-types-off-eggs-thumb

Ingredients for Bánh Thuẫn with Two Types of Eggs

  • 600g arrowroot flour (bột bình tinh)
  • 450g granulated sugar
  • 40g ginger juice
  • 40ml lime juice
  • 50ml pineapple juice
  • 2 chicken eggs
  • 5 duck eggs
  • 1/2 teaspoon salt
  • Cooking oil
how-to-make-central-vietnamese-banh-thuan-with-two-types-off-eggs-1

How to Make Traditional Bánh Thuẫn with Two Types of Eggs

Follow these steps to create your own delicious Bánh Thuẫn

Step 1: Prepare the Cake Batter

- Whisk Eggs: In a large bowl, crack 2 chicken eggs and 5 duck eggs. Add ½ teaspoon of salt. Using an electric mixer, beat at low speed for 2 minutes.

how-to-make-central-vietnamese-banh-thuan-with-two-types-off-eggs-2

- Add Lime Juice & Sugar: Next, add 40ml lime juice to the egg mixture and beat for another 3 minutes. Gradually add 450g granulated sugar to the bowl and continue beating for 10 minutes until the sugar is completely dissolved.

- Incorporate Juices: Once the sugar is fully dissolved, sequentially add 40g ginger juice and 50ml pineapple juice to the egg mixture, beating for 10 minutes after each addition to fully combine.

- Mix in Arrowroot Flour: Divide the 600g arrowroot flour into several portions. Gradually add each portion into the egg mixture, beating at high speed for 3 minutes after each addition. Continue until all the flour is incorporated and the mixture is smooth and homogeneous. The batter is now ready for baking.

Step 2: Baking the Bánh Thuẫn (Traditional Charcoal Method)

- Preheat Mold: When your charcoal stove is red hot, place the Bánh Thuẫn mold directly over the embers. Lightly brush a thin layer of cooking oil inside the mold. Once the oil is hot, you're ready to bake.

how-to-make-central-vietnamese-banh-thuan-with-two-types-off-eggs-3

- Pour Batter & Bake: Using a ladle, or carefully pouring, fill the mold about halfway with the prepared batter, ensuring it spreads evenly. Immediately cover the mold with its lid.

- Top Heat: Place additional hot charcoal embers on top of the mold's lid.

- Monitor & Finish: Wait for 3-4 minutes. Open the lid to check. The Bánh Thuẫn is cooked when it has risen to about double the height of the mold and turned a golden color.

how-to-make-central-vietnamese-banh-thuan-with-two-types-off-eggs-4

Important Baking Tips:

- Two-Source Heat: Successful Bánh Thuẫn requires heat from two sources: the charcoal fire underneath the mold and charcoal embers placed on the lid.

- Lid Temperature: The charcoal on the lid must reach a specific temperature – too hot will burn the cake, too little heat will prevent it from cooking through.

Preservation (Optional): If you wish to preserve the Bánh Thuẫn for longer and prevent mold, arrange the freshly baked cakes on a flat bamboo tray (nia) with small holes. Place the tray over a low charcoal stove and dry the cakes for half a day until they become firm and crisp.

Cách làm bánh thuẫn bằng bột bình tinh ngày Tết

Cách làm bánh thuẫn bằng bột bình tinh chuẩn vị, giúp bạn dễ dàng tự tay thực hiện món bánh thuẫn nướng thơm ngon, hấp dẫn ngay tại nhà để chiêu đãi gia đình và bạn bè trong những ngày đầu năm mới!

cach-lam-banh-thuan-bang-bot-binh-tinh-ngay-tet-1

Nguyên liệu làm bánh thuẫn bằng bột bình tinh ngày Tết

  • 800g bột bình tinh mịn
  • 10 quả trứng gà ta
  • 200g bột năng
  • 1kg đường 
  • 1 ống vani
  • Dầu ăn
  • Dụng cụ: Khuôn đúc bánh thuẫn, lò than
cach-lam-banh-thuan-bang-bot-binh-tinh-ngay-tet-2

Cách làm bánh thuẫn bằng bột bình tinh ngày Tết

Bước 1: Trộn bột bình tinh làm bánh thuẫn

Để bánh nở bông, tơi xốp và thơm ngon thì phần bột bánh phải được đánh thật kỹ, thật mịn, không có cặn. 

cach-lam-banh-thuan-bang-bot-binh-tinh-ngay-tet-3a

- Đập trứng gà vào tô rồi đánh thật mạnh tay cho nổi bông. Cho thêm đường trắng vào, đánh tan đường sao cho hỗn hợp nổi bông đặc, có thể nhỏ thử 1 giọt nước vào thấy không bị tan là được. Rồi lọc hỗn hợp trứng qua rây để không còn cặn.

cach-lam-banh-thuan-bang-bot-binh-tinh-ngay-tet-4

- Rây mịn bột bình tinh và bột vani, chia bột thành các phần nhỏ, lần lượt cho các phần bột vào tô trứng rồi đánh mịn cùng hỗn hợp. Mỗi lần thêm bột bình tinh vào tô nên đánh đều trong vòng 3 phút để đảm bảo bột và các nguyên liệu khác hòa quyện nhau. Thực hiện lặp lại thao tác và đánh đều cho đến khi hết bột.

Bước 2: Làm nóng 2 mặt khuôn nướng bánh thuẫn

cach-lam-banh-thuan-bang-bot-binh-tinh-ngay-tet-4a

Đặt khuôn bánh lên lò than đã đỏ, đậy nắp khuôn lại. Có thể gắp than nóng để lên nắp khuôn, mục đích là làm nóng cả 2 mặt khuôn. Sau khi đã nóng, mở nắp khuôn ra, dùng cọ sơn hoặc lấy miếng vải cột vào đầu đũa, nhúng tí dầu ăn, quết lên mấy lỗ đúc bánh trên mặt khuôn cho trơn.

Bước 3: Cách nướng bánh thuẫn bằng bếp than thơm lừng

Múc bột đổ đầy hết lỗ làm bánh trên khuôn. Đổ sao cho bột vừa tới mép khuôn là được và đậy nắp khuôn lại. Tiếp tục lấy kẹp gắp than đang đỏ dưới lò bỏ lên nắp khuôn cho bánh chín đều. Đợi khoảng 4 - 5 phút là bánh chín.
cach-lam-banh-thuan-bang-bot-binh-tinh-ngay-tet-5

Có thể kiểm tra bằng cách, lấy tăm đâm vào bánh xem bột có dính vào đầu tăm không? Không dính là chín. Khi bánh thuẫn chín, có màu vàng ươm hoặc vàng ruộm, bung ra như cánh hoa mai và tỏa hương thơm ngào ngạt. Bạn nên dùng cây nhọn hoặc nĩa lấy bánh ra.

cach-lam-banh-thuan-bang-bot-binh-tinh-ngay-tet-6

Bột bình tinh là bột gì? Bột bình tinh có tác dụng gì?

Bột bình tinh (arrowroot powder hoặc arrowroot starch) đã được sử dụng hơn 7000 năm, được chiết xuất từ củ bình tinh - một loại củ họ dong, có hình dạng như sừng tê giác. Thông thường, để làm bột bình tinh sẽ mài củ bình tinh, ngâm nước và lắng lấy bột.

Tác dụng bột bình tinh với sức khỏe

Tinh bột của củ bình tinh là loại tinh bột cực kỳ dễ tiêu hoá, ngay cả đối với trẻ còn trong độ tuổi ăn dặm. Củ bình tinh còn chứa nhiều loại vitamin B, bao gồm thiamin, niacin và pyridoxine. Ngoài ra còn chứa các nguyên tố vi lượng cần cho cơ thể cong người như đồng, sắt, mang-gan, ma-nhê, phốt pho và kẽm. Bột bình tinh hoàn toàn không chứa glu-ten nên luôn được những người bị dị ứng gluten lựa chọn thay thế bột mì.

  •  Tác dụng của bột bình tinh giúp cân bằng độ PH của cơ thể
  •  Bột bình tinh giúp cải thiện hệ thống tiêu hoá nhờ lượng tinh bột dễ hấp thu với nhiều chất xơ, tạo cân bằng đường huyết, phòng ngừa bệnh tiểu đường
  •  Đồng và sắt trong bột bình tinh giúp hệ thống chuyển hoá của cơ thể hoạt động tốt hơn, tăng cường trao đổi chất cho cơ thể
  •  Làm giảm cholesterol xấu, giúp giảm cân
  •  Bột bình tinh rất giàu vitamin B9 (folate), rất tốt cho thai phụ
  •  Bột bình tinh là nguồn cung cấp tinh bột cho người bị dị ứng gluten (thường có trong bột mì-wheat flour)

Ứng dụng bột bình tinh trong nấu ăn và làm bánh: Bột bình tinh giúp tạo độ giòn cho bánh hoặc các loại đồ chiên, làm sốt cho các loại bánh tráng miệng: sốt chocolate, nước cốt dừa… Và là nguyên liệu làm bánh thay cho bột mì (như bánh thuẫn miền Trung).

Chủ Nhật, 15 tháng 6, 2025

Cách làm bánh thuẫn Miền Trung dùng trứng vịt nở bung đẹp mắt

Hướng dẫn chi tiết cách làm bánh thuẫn miền Tây bằng bột bình tinh chuẩn vị, công thức dùng cả trứng gà và trứng vịt đảm bảo bánh nở bung, xốp mềm. 2 loại trứng này giúp bánh có màu vàng óng và độ bông xốp mong muốn.

Bánh thuẫn là món bánh truyền thống, đặc biệt quen thuộc với người dân miền Trung mỗi dịp Tết đến xuân về. Cách làm bánh thuẫn đúng chuẩn cho bánh có hình dáng như những bông hoa mai nở rộ, vàng ươm, thơm lừng mùi trứng sữa và gừng. 

cach-lam-banh-thuan-mien-trung-dung-trung-vit-thumb

Nguyên liệu làm bánh thuẫn Miền Trung truyền thống

  • 600g bột bình tinh
  • 450g đường
  • 40g nước cốt gừng
  • 40ml nước cốt chanh
  • 50ml nước ép thơm
  • 2 quả trứng gà
  • 5 quả trứng vịt
  • 1/2 mcf muối
  • Dầu ăn hoặc mỡ heo để chống dính khi nướng
cach-lam-banh-thuan-mien-trung-dung-trung-vit-1

Cách làm bánh thuẫn dùng trứng vịt nở bung cánh

Bước 1: Đánh trứng và đường - đây là công đoạn quan trọng nhất quyết định độ bông xốp của bánh.

- Đập 2 quả trứng gà và 5 quả trứng vịt vào một chiếc âu lớn, sạch và khô. Thêm vào 1/2 muỗng cà phê muối. Dùng máy đánh trứng đánh ở tốc độ thấp trong khoảng 2 phút để trứng tan đều.

- Cho 40ml nước cốt chanh vào âu trứng, tiếp tục đánh ở tốc độ vừa trong 3 phút. Nước chanh sẽ giúp khử mùi tanh của trứng và làm bánh trắng hơn.

- Từ từ cho 450g đường vào âu trong khi máy vẫn đang chạy. Tăng dần lên tốc độ cao nhất, đánh liên tục từ 10 - 15 phút. Đánh cho đến khi hỗn hợp chuyển sang màu trắng ngà, bông đặc, nhấc que đánh lên thấy trứng chảy xuống thành dòng như ruy băng là đạt.

Bước 2: Trộn bột làm bánh thuẫn miền Trung

- Sau khi trứng đã được đánh bông, hạ máy về tốc độ thấp. Lần lượt cho 40g nước cốt gừng và 50ml nước ép thơm vào, đánh nhẹ nhàng thêm khoảng 1-2 phút cho các nguyên liệu hòa quyện.

- Rây mịn 600g bột bình tinh, sau đó chia bột thành 3 - 4 phần.

- Cho từng phần bột vào âu trứng. Dùng phới lồng hoặc máy đánh trứng ở tốc độ thấp nhất, trộn nhẹ nhàng theo một chiều từ dưới lên trên (kỹ thuật fold). Chỉ trộn đến khi không còn thấy bột khô, hỗn hợp mịn mượt là dừng lại. Lưu ý: Không trộn bột quá lâu sẽ làm vỡ bọt khí trong trứng, khiến bánh bị chai, không nở được.

Bước 3: Cách nướng bánh thuẫn bằng bếp than thơm lừng

- Nhóm bếp than cho cháy hồng đều. Đặt khuôn bánh thuẫn lên bếp cho thật nóng.

- Dùng cọ hoặc một miếng vải sạch thấm dầu ăn (hoặc mỡ heo) thoa một lớp thật mỏng vào khắp lòng khuôn.

- Khi khuôn đã nóng già, dùng muôi múc bột đổ vào khoảng 2/3 khuôn. Không nên đổ đầy vì bánh sẽ nở cao.

cach-lam-banh-thuan-mien-trung-dung-trung-vit-3

- Đậy nắp khuôn lại. Nhanh tay đặt một vài cục than hồng đang cháy lên trên nắp khuôn để tạo nhiệt trên, giúp mặt bánh vàng đẹp và nở bung.

- Nướng khoảng 3 - 4 phút. Khi bạn ngửi thấy mùi thơm và thấy bánh nở cao, bung xòe các cánh, có màu vàng ươm là bánh đã chín.

cach-lam-banh-thuan-mien-trung-dung-trung-vit-4

-  Dùng que tăm tre nhọn nhẹ nhàng lấy bánh ra khỏi khuôn. Tiếp tục thoa dầu và đổ mẻ bánh tiếp theo cho đến khi hết bột.

Bí quyết nướng bánh thuẫn: Để làm bánh thuẫn thành công, cần phải có "lửa trên lửa dưới", tức là nhiệt từ bếp than bên dưới và nhiệt từ than hồng đặt trên nắp. Nhiệt độ phải cân bằng, nếu lửa trên nắp quá nóng bánh sẽ cháy mặt, nếu quá yếu thì bánh không nở bung được.

Bí quyết làm bánh thuẫn nở đẹp: Trong quá trình nướng, tuyệt đối không mở nắp ra xem quá sớm vì sự thay đổi nhiệt độ đột ngột sẽ làm bánh bị xẹp. 

cach-lam-banh-thuan-mien-trung-dung-trung-vit-2 

Sau khi thực hiện xong các làm bánh thuẫn, bánh thường còn khá ẩm. Nếu muốn bảo quản lâu hơn (hàng tháng) mà không bị mốc, bạn hãy xếp bánh lên một chiếc nia hoặc vỉ thưa, bên dưới là bếp than đã tàn (chỉ còn hơi nóng). Sấy bánh trong khoảng nửa ngày cho đến khi bánh khô và cứng lại. Khi ăn, bánh sẽ giòn tan rất ngon. Bảo quản bánh đã sấy trong hũ kín ở nơi khô ráo. 

Thứ Hai, 26 tháng 5, 2025

Oven-Baked Banh Thuan: A Convenient Twist on a Classic

Having shared recipes for steamed Banh Thuan and the traditional charcoal-grilled method, we're excited to offer another option for Banh Thuan lovers: baking them in an oven!

This oven-baked Banh Thuan recipe yields a cake with a delightfully golden, crispy crust and a soft, fluffy interior, all with that signature aroma. It's a much more convenient method, especially for those living in urban areas.

oven-baked-banh-thuan-Vietnamese-thumb

Ingredients for Oven-Baked Banh Thuan

  • 100g All-Purpose Flour
  • 10g Cornstarch
  • 3 Chicken Eggs
  • 1 tsp Vanilla Extract
  • 90g Sugar
  • Equipment: Banh Thuan molds or cupcake/muffin molds
oven-baked-banh-thuan-Vietnamese-1

Instructions for Oven-Baked Banh Thuan

Step 0: Prepare and Preheat
Lightly grease your molds to prevent sticking. Place the greased molds into your oven and preheat both the oven and molds for 10 minutes at 200°C (390°F).

Step 1: Dry the Flours
Spread the all-purpose flour and cornstarch thinly on a baking sheet. (If using pandan leaves, cut them into pieces and place them on the tray with the flours.) Dry them in the oven at 130°C (265°F) for about 15 minutes. This step helps prevent the Banh Thuan from becoming moldy or having a "eggy" smell.

Step 2: Whip Eggs and Sugar
In a large bowl, whisk the eggs until light and frothy, about 3 minutes. Gradually add the sugar while continuing to whisk until the mixture becomes pale and smooth.

Step 3: Combine Dry and Wet Ingredients
Sift the dried flours into the egg mixture. Add the vanilla extract. Using a spatula, gently fold the ingredients together until just combined. Be careful not to overmix.
oven-baked-banh-thuan-Vietnamese-2

Step 4: Fill the Molds
Carefully remove the preheated molds from the oven. Ladle the Banh Thuan batter into each cavity, filling them slightly below the rim to allow for expansion as the cakes bake.

Step 5: Bake
Place the filled molds back into the preheated oven. Bake for 13-15 minutes at 200°C (390°F), or until the Banh Thuan are golden brown and fragrant. Once baked, remove them from the oven and let them cool completely before taking them out of the molds.

Enjoy making this Oven Baked Banh Thuan recipe for a perfectly crispy crust and fluffy cake every time!

Traditional Charcoal-Grilled Banh Thuan Vietnamese Recipe

Banh Thuan is a beloved traditional cake from Vietnam's Mekong Delta and Central regions. Unlike many modern pastries, authentic Banh Thuan recipes rely on arrowroot flour (bột bình tinh) and the leavening power of whipped eggs and heat, rather than baking powder. This unique preparation results in a delightful cake that can also be dried for extended preservation.

traditional-charcoal-grilled-banh-thuan-Vietnamese-thumb

Ingredients for Traditional Charcoal-Grilled Banh Thuan

  • 5 Chicken Eggs: (You can use duck eggs or a mix of both based on preference. Free-range chicken eggs are recommended for superior flavor and color.)
  • 400g Fine Arrowroot Flour (Bột Bình Tinh/Huỳnh Tinh): This starch, extracted from the arrowroot plant, is also known as "củ dong" in Northern Vietnam. It's known for its cooling properties, aiding digestion and skin health.
  • 100g Tapioca Starch
  • 5g Baking Powder
  • 500g White Sugar
  • 55ml Unsweetened Fresh Milk
  • 1/2 tube Vanilla Extract
  • Peanut Oil or Regular Cooking Oil
  • 1 Lemon
  • 1 Mandarin Orange: Juiced
  • Equipment: Banh Thuan molds, charcoal stove, charcoal
traditional-charcoal-grilled-banh-thuan-Vietnamese-1

Instructions for Traditional Charcoal-Grilled Banh Thuan

Step 1: Whisk Eggs with Sugar
In a large bowl, whisk the eggs and sugar together until the sugar is fully dissolved and the mixture is well combined.

Step 2: Incorporate Liquids
Add the lemon juice, mandarin juice, and fresh milk to the egg and sugar mixture. Whisk thoroughly until everything is evenly blended.

Step 3: Combine Dry and Wet Ingredients
Sift the all-purpose flour, arrowroot flour, baking powder, and tapioca starch into the wet mixture. Mix until a smooth, homogeneous batter forms, then stir in the vanilla extract.

Step 4: Charcoal Grilling the Banh Thuan
traditional-charcoal-grilled-banh-thuan-Vietnamese-2

- Heat the Molds: Light your charcoal stove with charcoal and wood. Place the Banh Thuan mold on top of the stove. Heat both sides of the mold evenly by placing burning charcoal on the mold's lid.
Grease the Molds: Lightly brush the indentations of the mold with peanut oil or cooking oil to prevent sticking.
- Pour the Batter: Carefully ladle the batter into each cavity of the mold. Be mindful of the quantity; the batter should reach just up to the mold's rim. Overfilling can lead to uneven cooking and messy cakes, while underfilling can result in small, burnt cakes that don't puff up correctly.
- Bake with Charcoal: Use tongs to transfer hot, glowing charcoal from beneath the stove onto the lid of the mold. This ensures even cooking from both the top and bottom.

traditional-charcoal-grilled-banh-thuan-Vietnamese-3


- Check for Doneness: After about 3 minutes, the cakes will begin to release a fragrant aroma. Use a toothpick or a sharpened bamboo stick to check for doneness. Insert the stick into a cake; if it comes out clean, the cake is cooked.
- Remove and Repeat: Carefully remove the golden-brown cooked cakes with the pointed stick. Continue pouring batter into the molds and baking until all the batter is used.
traditional-charcoal-grilled-banh-thuan-Vietnamese-4

Step 5: Drying for Extended Preservation

To prolong the shelf life of your Banh Thuan, dry them after baking. Arrange all the cooked cakes on a bamboo tray or serving platter. Gently dry them over low heat on a stove. This process helps the cakes firm up, intensifies their flavor, and creates a dry exterior, preventing mold and allowing them to be stored for a longer period.

Enjoy your homemade Traditional Charcoal-Grilled Banh Thuan! Do you have any other traditional Vietnamese recipes you'd like to explore?

Delicious Cocoa Flavored Steamed Bánh Thuẫn (Vietnamese Sponge Cake) Recipe

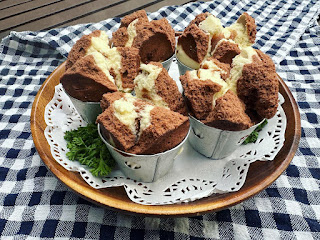
After sharing our pandan-flavored Bánh Thuẫn, we're excited to bring you another delightful variation: Cocoa Flavored Steamed Bánh Thuẫn! This recipe creates a beautiful two-tone cake with the warm yellow of vanilla and the rich brown of cocoa, offering a unique twist on the traditional Vietnamese sponge cake.

delicious-cocoa-flavored-steamed-banh-thuan-Vietnamese-thumb

Ingredients for Cocoa Flavored Steamed Bánh Thuẫn:

  • 200g all-purpose flour
  • 150g granulated sugar
  • 1 chicken egg
  • 1 teaspoon vanilla extract
  • 1/2 teaspoon salt
  • 1 teaspoon baking powder
  • 200ml coconut milk (unsweetened fresh milk can be substituted)
  • 1 teaspoon cocoa powder

Step-by-Step Instructions for Cocoa Flavored Steamed Bánh Thuẫn:

Follow these steps to create a beautiful and delicious two-toned Bánh Thuẫn:

Step 1: Combine All Ingredients

In a large mixing bowl, combine all the main ingredients: 200g all-purpose flour, 150g granulated sugar, 1 chicken egg, 1 teaspoon vanilla extract, 1/2 teaspoon salt, 1 teaspoon baking powder, and 200ml coconut milk.

delicious-cocoa-flavored-steamed-banh-thuan-Vietnamese-1
delicious-cocoa-flavored-steamed-banh-thuan-Vietnamese-2

Step 2: Beat the Batter Until Smooth

Using a handheld electric mixer (a whisk can be used, but it will require more time and effort), begin beating the mixture at a low speed. Gradually increase the speed and continue beating in one consistent direction. Beat for approximately 15-20 minutes until the batter becomes smooth, elastic, and flows in a thick ribbon. This extensive beating is crucial for the cake's texture.


delicious-cocoa-flavored-steamed-banh-thuan-Vietnamese-4

Step 3: Divide and Flavor the Batter

Divide the prepared batter into two portions, maintaining an approximate ratio of 20:80 (smaller portion for cocoa, larger for vanilla). Add 1 teaspoon of cocoa powder to the smaller portion of batter and stir until well combined and evenly colored. Now you have two distinct batters: a plain (vanilla-colored) batter and a cocoa batter.


delicious-cocoa-flavored-steamed-banh-thuan-Vietnamese-5

delicious-cocoa-flavored-steamed-banh-thuan-Vietnamese-6

delicious-cocoa-flavored-steamed-banh-thuan-Vietnamese-7

Step 4: Prepare Molds and Pour Batter

Lightly grease your steaming molds with cooking oil to prevent sticking. Pour the plain (vanilla-colored) batter into each mold, being careful not to fill it completely. Then, gently spoon the cocoa batter on top of the plain batter. For the classic Bánh Thuẫn "blooming" effect, use a sharp knife or skewer, dip it into the batter, and carefully make a cross-shaped cut on the surface of each cake.


delicious-cocoa-flavored-steamed-banh-thuan-Vietnamese-8

Step 5: Steam the Bánh Thuẫn

Place a pot of water on the stove and bring it to a boil. Once the water is boiling, place the molds into a steamer basket and then set the steamer basket into the pot. Steam over medium-low heat for approximately 20 minutes.


delicious-cocoa-flavored-steamed-banh-thuan-Vietnamese-9

Step 6: Cool and Serve

Once the Bánh Thuẫn are cooked through, carefully remove them from the steamer. Let them cool slightly in the molds before gently removing them.

Enjoy your delightful homemade Cocoa Flavored Steamed Bánh Thuẫn!

Fluffy Steamed Bánh Thuẫn (Vietnamese Sponge Cake) with All-Purpose Flour

Looking for a simple yet delicious Vietnamese dessert? This recipe for Steamed Bánh Thuẫn using all-purpose flour is perfect for achieving that signature fluffy, "blooming" texture! With easily accessible ingredients and clear steps, you'll be able to create this traditional treat at home. The key to its perfect rise is vigorous beating of the batter until it turns an ivory color.

fluffy-steamed-banh-thuan-vietnamese-thumb

Ingredients for Steamed Bánh Thuẫn:

  • 250g all-purpose flour
  • 200g granulated sugar
  • 2 chicken eggs
  • 10g baking powder
  • 10ml lemon juice
  • 1 teaspoon vanilla extract
  • 250ml unsweetened fresh milk (cold water can be substituted)
  • A small amount of green food coloring (e.g., pandan extract, optional)
fluffy-steamed-banh-thuan-vietnamese-3

Step-by-Step Instructions for Fluffy Steamed Bánh Thuẫn:

Follow these instructions to make your Bánh Thuẫn bloom beautifully:

Step 1: Prepare the Batter

Combine all ingredients (250g all-purpose flour, 200g granulated sugar, 2 chicken eggs, 10g baking powder, 10ml lemon juice, 1 teaspoon vanilla extract, 250ml unsweetened fresh milk) in a large mixing bowl. Using an electric mixer, start at a slow speed and gradually increase to a faster speed. Beat the mixture continuously until it transforms from a liquid consistency to a smooth, thick batter. The batter will change color from yellow to an ivory white. This extensive beating is crucial for the cake to achieve its signature airy, "blooming" texture.

Step 2: Divide and Color the Batter (Optional)

Divide the prepared batter into two portions. Add a small amount of green food coloring (such as pandan extract) to one portion to create a vibrant green color. This step is optional but adds visual appeal.

Step 3: Fill the Molds

Place paper cupcake liners into your steaming molds. Pour the plain (white) batter into each mold, filling about 2/3 of the way. Then, add the green batter on top, filling the remaining 1/3 of the mold.

fluffy-steamed-banh-thuan-vietnamese-2

Step 4: Steam the Bánh Thuẫn

Bring a pot of water to a rolling boil. Carefully place the steamer basket containing the filled molds into the pot. Steam for 16-17 minutes until the cakes are cooked through and have "bloomed" beautifully. Once cooked, turn off the heat and immediately remove the steamer basket from the pot.

fluffy-steamed-banh-thuan-vietnamese-1

Important Note: Do not over-steam the cakes, as prolonged steaming can make them tough and soggy due to condensation.

Enjoy your homemade, fluffy Steamed Bánh Thuẫn!

Thứ Ba, 23 tháng 4, 2024

Cách làm bánh thuẫn hấp vị cacao

Cùng với công thức làm bánh thuẫn hấp vị lá dứa cho 2 màu trắng - xanh, hôm nay Bếp lại tiếp tục chi sẻ cho các bạn công thức làm bánh thuẫn hấp vị cacao với 2 màu vàng - nâu của vani và cacao nhé!

Cách làm bánh thuẫn hấp vị cacao thumb

Nguyên liệu làm bánh thuẫn hấp vị cacao

  • 200g bột mì
  • 150g đường cát
  • 1 trứng gà
  • 1 muỗng cf vani
  • 1/2 muỗng cf muối
  • 1 muỗng cf baking powder
  • 200ml nước cốt dừa (có thể thay thế bằng sữa tươi không đường)
  • 1 muỗng cf bột cacao

Cách làm bánh thuẫn hấp vị cacao

Bước 1: Cho bột mì + đường cát + trứng gà + hương vani + muối + bột nở + nước cốt dừa vào âu.

Bước 2: Dùng máy đánh trứng cầm tay đánh lên đều (có thể dùng phới lồng để đánh, nhưng sẽ mất thời gian và sức hơn). Bắt đầu đánh tốc độ nhỏ, sau đó đánh tốc độ cao, đánh theo 1 chiều. Đánh khoảng 15-20 phút, cho bột mịn dẻo và dòng chảy của bột sánh kẹo.

Bước 3: Chia bột ra làm 2 phần, theo tỉ lệ 20:80. Sau đó cho bột cacao vào phần bột ít hơn và khuấy đều. Như vậy là mọi người có 2 phần bột màu trắng và bột cacao.

Bước 4: Thoa dầu ăn vào khuôn để chống dính, sau đó đổ bột màu trắng vào khuôn, lưu ý không đổ đầy, sau đó cho lớp bột cacao vào lên trên. Dùng dao có mũi nhọn nhúng vào và rạch chữ thập trên mặt bánh.

Bước 5: Bắc nồi nước lên bếp, khi nồi nước sôi, cho khuôn bánh vào xửng hấp và đặt vào nồi, hấp với lửa vừa nhỏ trong khoảng 20 phút.

Cách làm bánh thuẫn hấp vị cacao 1

Bước 6: Khi bánh chín thì lấy ra, để cho hơi nguội rồi lấy bánh ra khỏi khuôn.

Chúc các bạn thành công!

Thứ Năm, 13 tháng 4, 2023

Cách làm bánh thuẫn nướng lò tiện lợi

Đã có công thức làm bánh thuẫn hấp và cách làm bánh thuẫn nướng than truyền thống rồi, nay Bếp Bánh chia sẻ thêm cho các bạn công thức làm bánh thuẫn nướng bằng lò nướng nữa nhé.!!!

Với cách nướng bằng lò này thì bánh thuẫn sẽ có vỏ bánh vàng giòn, bên trong mềm xốp rất thơm và tiện lợi cho các bạn ở thành phố hơn.

Cách làm bánh thuẫn nướng lò tiện lợi

Nguyên liệu làm bánh thuẫn nướng lò

  •  100gr bột mì
  •  10gr bột bắp
  •  3 trứng gà
  •  1 muỗng cà phê vanilla
  •  90gr đường
  • Khuôn bánh thuẫn hoặc khuôn cupcake/muffin
khuôn làm bánh thuẫn nướng lò tiện lợi

Cách làm làm bánh thuẫn nướng lò

Bước 0: Thoa dầu vào chống dính khuôn, cho vào lò nướng làm nóng lò và khuôn trước 10' ở mức nhiệt 200 độ C.

Bước 1: Bột mì + bột bắp và lá dứa cắt khúc cho ra khay, dàn mỏng sáy khô ở nhệt độ 130 độ C trong khoảng thời gian 15 phút. Cách này sẽ giúp bánh thuẫn không bị mốc và tanh

Bước 2: Cho trứng vào âu đánh bông mịn, khoảng 3 phút, sau đó cho từ từ đường vào tiếp tục đánh cho đến lúc hỗn hợp chuyển sang màu nhạt-mịn

Bước 3: Rây mịn bột vào và cho vanilla vào, dùng phới nhẹ nhàng trộn đều

Cách làm bánh thuẫn nướng lò tiện lợi 3

Bước 4: Lấy khuôn đã làm nóng ra ra, múc bột đổ vào từng khuôn (chỉ đổ thấp hơn mặt khuôn để bánh còn nở

Bước 5: Cho khuôn bánh vào nuớng 13-15', nhiệt 200 độ C. Bánh chín vàng thơm thì lấy ra, để nguội trước khi lấy bánh khỏi khuôn.

Chúc các bạn thành công!!!


Bếp Bánh Template by Ipietoon Cute Blog Design